First Contentful Paint (FCP)
First Contentful Paint marks the time at which the first text or image is painted.*
Time to Interactive
Time to interactive is the amount of time it takes for the page to become fully interactive.*
Speed Index
Speed Index shows how quickly the contents of a page are visibly populated.*
Total Blocking Time (TBT)
Sum of all time periods between FCP and Time to Interactive.*
Largest Contentful Paint (LCP)
Largest Contentful Paint marks the time at which the largest text or image is painted.*
Cumulative Layout Shift (CLS)
Cumulative Layout Shift measures the movement of visible elements in the viewport.*
12 Blazing Hot Tips for Improving Page Load Speed
Reduce unused JavaScript.
Helps with: First Contentful Paint, Time to Interactive, Speed Index, Total Blocking Time.
Often, finding opportunities to clean up JavaScript can help pages load significantly faster. (It's also never a bad idea to have clean code.)
The best part about this particular item is that you can likely change some of the JavaScripts that are referenced centrally, and if they are called across many of your pages, make a huge change in page speed website-wide.
Part 1: Detect Unused JavaScript
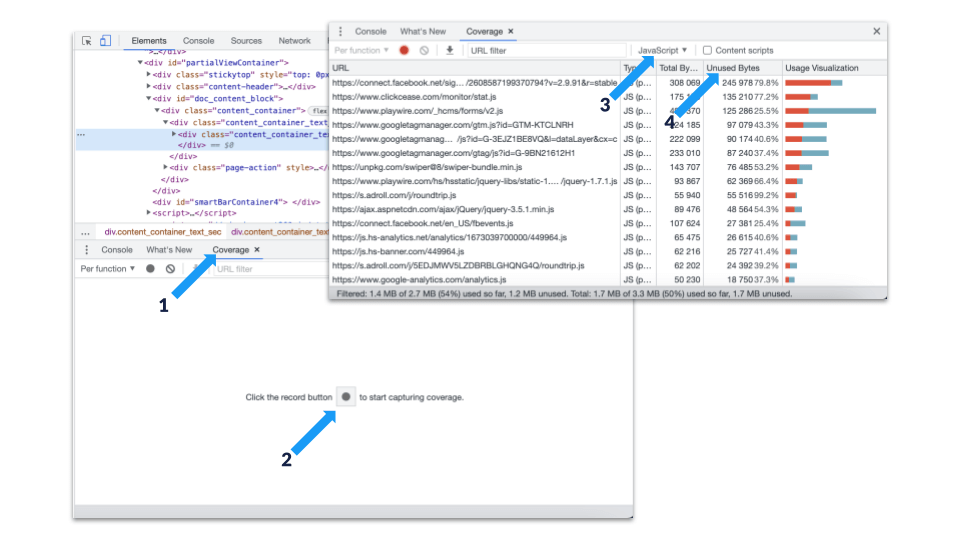
Start by finding which JavaScript is unused. Use Chrome DevTools to detect unused JavaScript.
- Inspect the page using Chrome DevTools, select the Coverage tab.
- Then click “Record” to start capturing.
- Filter down by file type to just JavaScript files.
- Then review the opportunities to see which JavaScript files have the most unused bytes.
Part 2: Clean it Up
How you choose to clean up the unused JavaScript will be highly dependent upon your code and the build tool you use. Three common areas for improvement are:
- Code Splitting: You can break up bundled code into smaller chunks that can be conditionally loaded independently (so you can choose to load only that which you need for a specific page, or defer loading of specific chunks if needed).
- Unused Code Elimination: This is the practice finding code which is not used by the current application or page and removing it from loading on that page. A popular tool to help with this is Terser.
- Unused Imported Code: This is the process of removing imported code that is never used by the application or page, a process some build tools can help with.
Want to dig into the really nitty gritty details on how to do all of this beyond this high level overview? Jump into the links listed above or learn more about how to reduce unused JavaScript from Google's resources.
Eliminate render-blocking resources.
Helps with: First Contentful Paint, Time to Interactive, Speed Index, Total Blocking Time.
This is another opportunity to make a big dent in page speed website-wide with more "centrally" located changes.
Most websites have a few primary page templates they follow, making easy to change how each of your standard page templates are treating JavaScript and CSS to improve your site speed across all pages of your website.
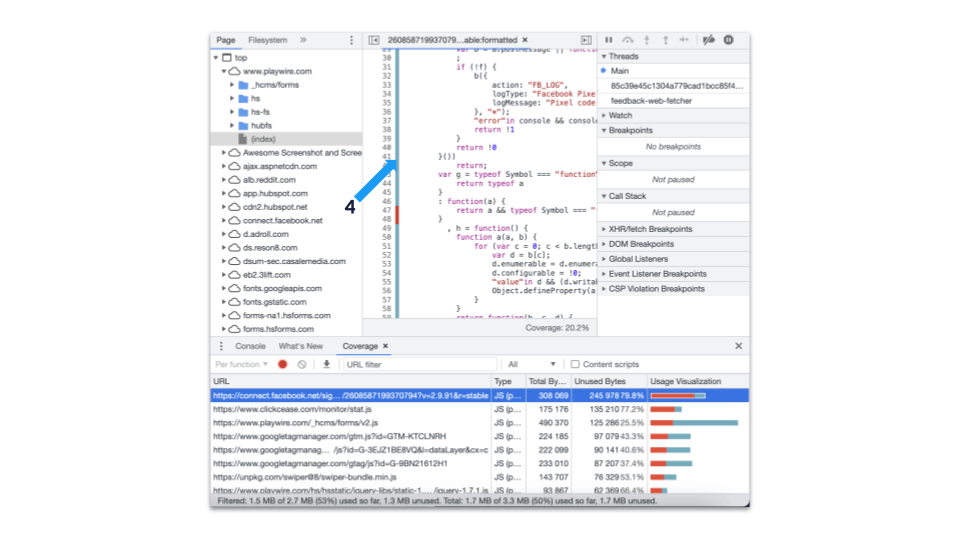
Part 1: Identify Render Blocking Resources
- Inspect the page using Chrome DevTools, select the Coverage tab.
- Then click “Record” to start capturing.
- Click on the file you want to look out to see the breakdown of critical vs. unused. Review the code to see what is critical (green) vs. unused (red). Then follow the instructions on the next two slides to eliminate render-blocking scripts and render-blocking CSS.
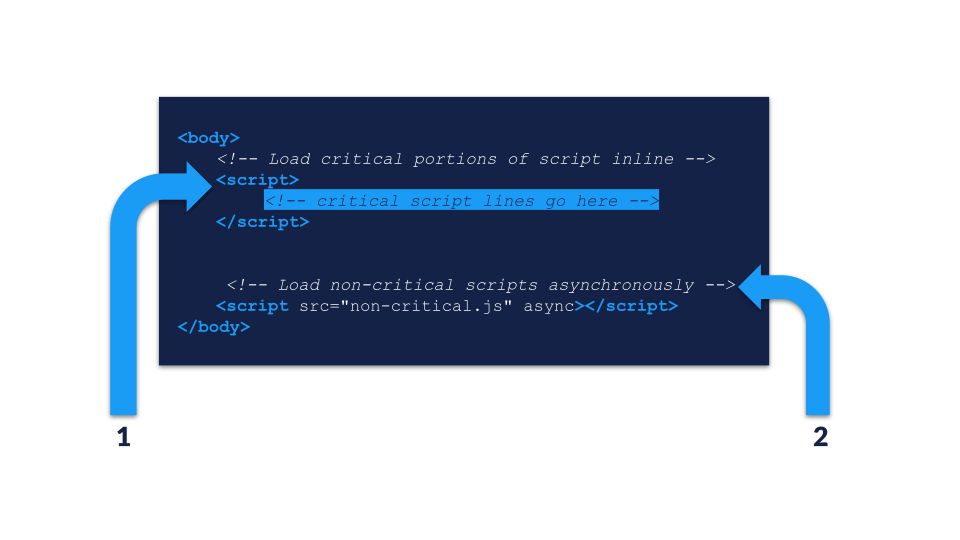
Part 2: Eliminate Render-Blocking JavaScript
- Load Critical Portions of the Script Inline: Move the critical portions of your script (those shown in green in Chrome DevTools in the previous slide) directly onto the page.
- Load Non-Critical Portions Asynchronously: Take the non-critical portions and leave them in the URL, loading them using the “async” attribute.
Part 3: Eliminate Render-Blocking CSS
- Load Critical Portions of the CSS Inline: Move the critical portions of your CSS (those shown in green in Chrome DevTools in the previous slide) directly onto the head of the page.
- Preload Load Non-Critical Portions: Link to the non-critical portions of the CSS using the “preload” attribute.
You can dig deeper into the nitty-gritty details of how to do all of this, if you are so inclined by perusing Google's library on eliminating render-blocking resources.
Reduce unused CSS.
Helps with: First Contentful Paint, Time to Interactive, Speed Index, Total Blocking Time.
This is another opportunity to make a big dent in page speed website-wide with more "centrally" located changes.
Most websites have a few primary page templates they follow, making easy to change how each of your standard page templates are treating JavaScript and CSS to improve your site speed across all pages of your website.
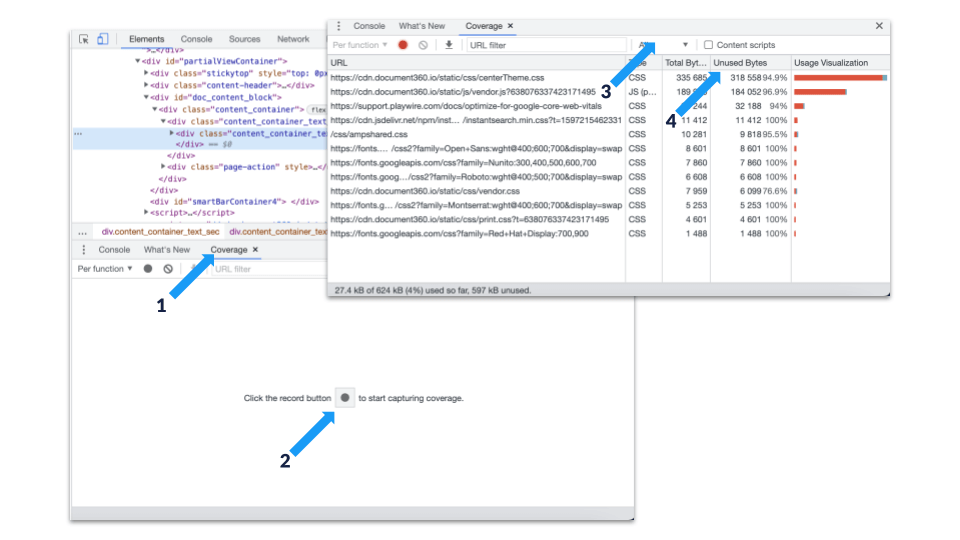
Part 1: Detect Unused CSS
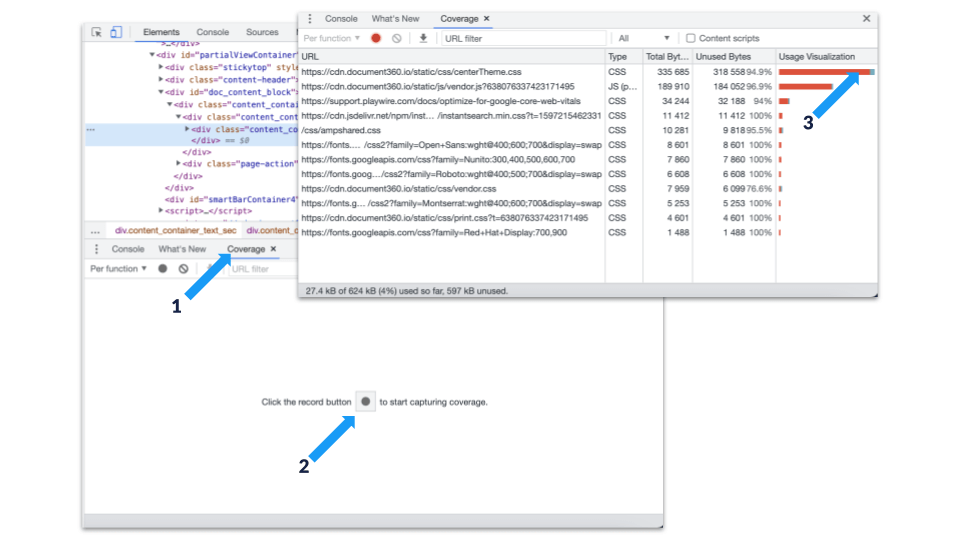
Use Chrome DevTools to detect unused CSS.
- Inspect the page using Chrome DevTools, select the Coverage tab.
- Then click “Record” to start capturing.
- Filter down by file type to just CSS files.
- Then review the opportunities to see which CSS files have the most unused bytes.
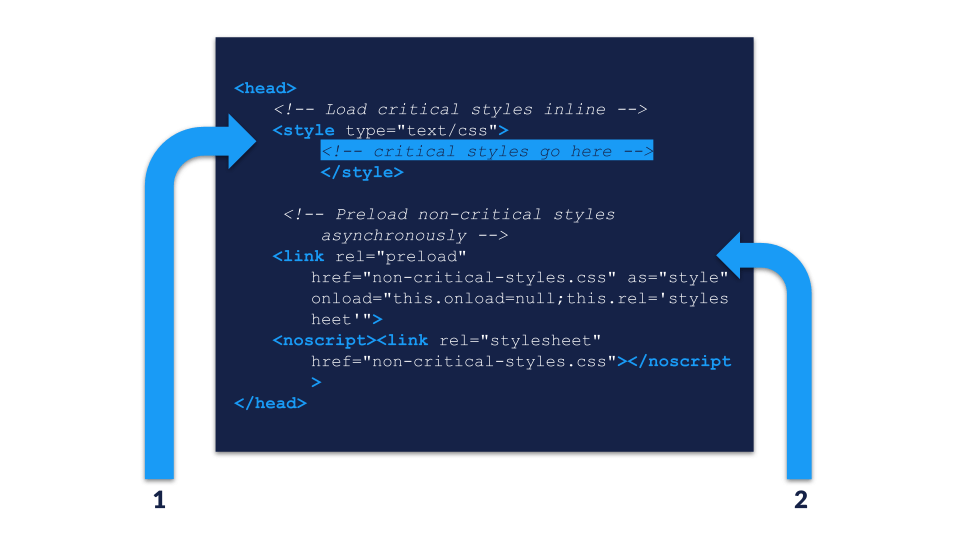
Part 2: Inline or Defer CSS
- Inline your critical styles required for the first “paint” in a <style> block in the head of your page.
- Load the rest of the styles using the preload link to load asynchronously.
Feel free to peruse these resources from Google for additional tips beyond this primary recommendation for reducing unused CSS.
Properly size images.
Helps with: All Core Web Vitals.
For many websites, images are by far the biggest offender when it comes to page load speed.
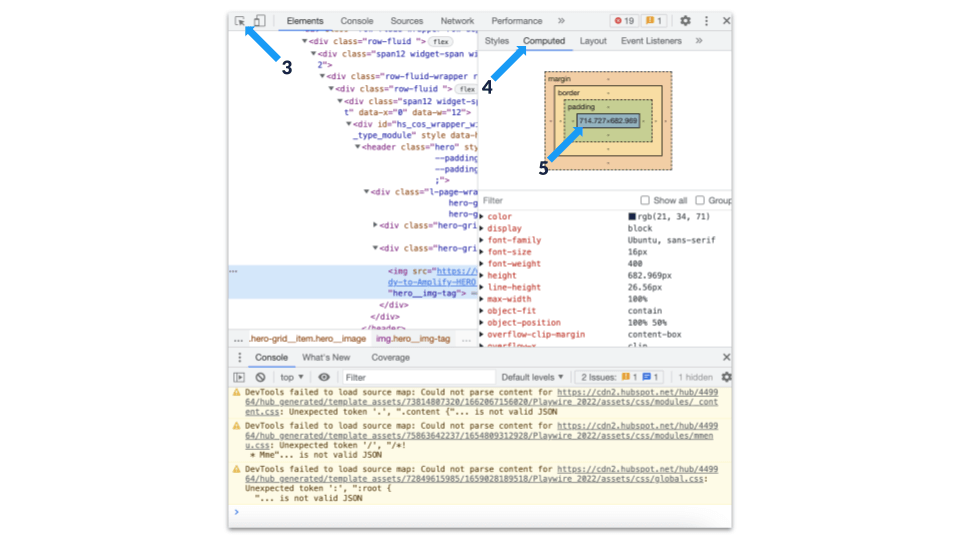
Images should be appropriately sized and optimized before uploading them to your CMS to ensure that images are sized to fit the space they’ll be expected to fill. To optimize existing images, the Chrome DevTools Elements panel can be used to determine what size an image is displayed at on a live page.
- Visit the web page with the offending image from the largest size screen you can.
- Inspect the page using Chrome DevTools.
- Select the image you want to review. (Simply click on the arrow selector, then click on the image on the page.)
- Choose the "Computed" tab.
- Review the size of the image as shown on the page. If your original image is 1200x1200 pixels but is only showing up at 400x400 pixels large on the largest screen, you will want to start with a smaller source image to save on resources used to load the page.
- Decide if you need to add a buffer for larger screen sizes than the one you tested on and resize the image appropriately.
- Resize the image, either from the original source where you created the image (like a Canva or Photoshop), or you can use a tool like this to resize an existing image. Additionally, if stock imagery tends to be your biggest offender, make sure you are downloading a smaller version of the image from your stock photo source.
- Reload the image up to your CMS when done.
You can either resize the image to match the largest size it displays at or choose to use responsive image sizes (see tip titled "Consider responsive images" below).
For future best practices, we'd recommend building some clear processes for how your team should create, download, optimize (see next tip) and then upload images on a consistent basis to make sure you aren't creating more of a speed problem in the future.
Feel free to dig in and learn even more here.
Optimize images.
Helps with: All Core Web Vitals.
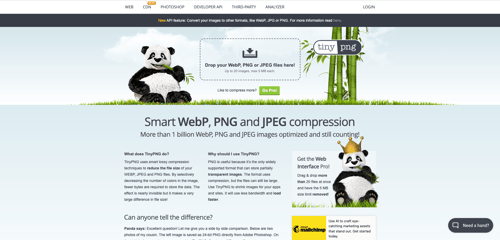
Once you’ve ensured your images are properly sized (see previous tip titled "Properly size images") for upload in the first place, you can use tools like Tiny to optimize pngs, jpegs, and WebP image size further. This will ensure you have the right compression levels for optimal load speed.
For future best practices, we'd recommend building some clear processes for how your team should create (see previous tip), download, optimize and then upload images on a consistent basis to make sure you aren't creating more of a speed problem in the future.
Serve images in next-gen formats.
Helps with: All Core Web Vitals.
Another way to reduce the amount of time it takes to load images on your website is to use some of the "next-gen" formats available.
AVIF and WebP are image formats that have superior compression and quality characteristics compared to their older JPEG and PNG formats. You can use a web converter on individual images or consider a plugin that automatically converts for you on major CMSs.
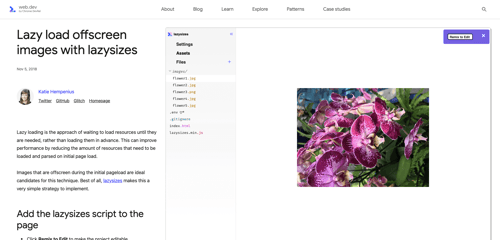
Defer offscreen images.
Helps with: Cumulative Layout Shift.
If your website is image-heavy, lazy loading images that are below the fold is a great way to defer some of the effort required in loading them, spending the bulk of the time doing so only after the above-the-fold content has already loaded. This helps hugely on Cumulative Layout Shift (CLS).
Lazy loading offscreen images can help significantly with your “Time to Interactive” web vitals score. You can either use a plugin for major CMSs that can help with Lazy Loading or consider using the LazySizes github repository.
Identify images that always load below the fold. Any of these images are potential options for lazy loading.
Consider responsive images.
Helps with: All Core Web Vitals.
Serving up responsive images can help with both user experience and page load speed. Essentially you’ll be providing different images for different devices.
From an experience perspective, this means that the images being served are specifically hand-picked for the device, creating the best experience for the user. On the speed side, this allows for reduction in image loading time on smaller screens (as you can load smaller images on those devices), and is particularly helpful with mobile load speed.
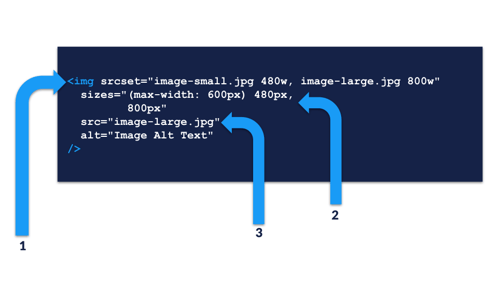 To do this using HTML:
- Identify Source Set of Images: List the set of images to use as the source images for varying screen sizes. (You’ll have to create and upload each variation of image size you want.)
- Define Sizes: Clarify at which screen sizes to use different image variations.
- Set Default Size: Identify which image to use as the default.
Find more detailed guidance on how to do this in this resource.